11-20-2001
This job ranks on the pain-in-the-a$$ scale right up there with changing the microfilter.
Increased resistance with age in the points in the brake light switch is usually the cause of the "Brake Light Circuit" check control fault message. You can either install a new switch, part no. 61 31 8 360 417, $23.21 list at the dealer, $10.54 at Zygmunts, or disassemble & clean the old one. The switch is clipped to a bracket above the brake pedal, above the black plastic kick panel. It's easy to remove the screws & fasteners to get the panel loose, but I wasn't able to remove it. I was anticipating a 5 minute job so didn't have the camera handy when doing it so only have pictures of the switch. To get to the switch, I had to remove the knee panel below the steering column. To remove it, pry out the two wood trim pieces on either side of the steering column. Unclip the dash dimmer switch to get the left one off (assumes left-hand-drive). This exposes the three metal tabs which fasten the top edge of the upholstered panel with sheet metal screws. Remove these screws & the ones on the underside & remove the panel. Now, a metal/foam knee crash bumper is exposed. On some models it may be an airbag, so disconnect the battery (noting radio code) & take proper precautions. Mine is plain without an airbag & fastens with four 6 mm hex-head screws (10 mm socket wrench), 2 on each end. Remove this bumper. Now you can see & reach the brake light switch. It has the standard "pinch" to release electrical connector which pulls off.
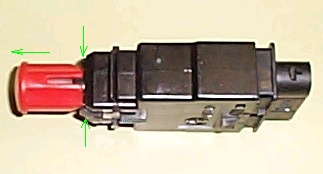
Depress the brake pedal and slide the red sleeve all the way out, keeping the brake pedal depressed. You may hear some clicking when it pulls the ratcheted white end post out to it's fully extended position, but it will stop at the end of its travel. Then pinch the two retainer clips together & pull the switch out of it's bracket. It may need some persuasion with a screwdriver to pry it out.

To clean the points, open the socket end of the switch by prying open. It has four detents, two on each side. It helps to do this inside a clear plastic bag so the springs don't get lost.
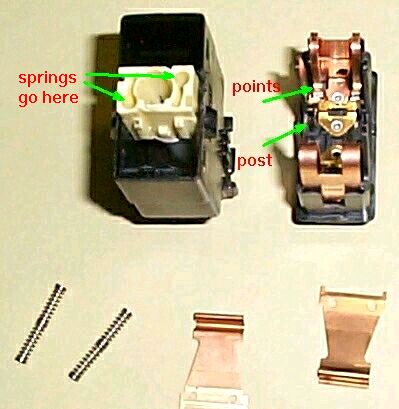
There are 2 pairs of points. To clean the points, cut a narrow strip from a business card & soak with contact cleaner, WD-40, or alcohol & insert it between the contacts & rub them a few dozen times. Extremely fine emory cloth may work, but I don't recommend a rough grit. (This would be a good place to use Stabilant 22a contact enhancer, available in Canada, do a search on Google.com to find it). The metal "flaps" hang from notches in the perches on the right side. The "bumps" of the flaps face each other when re-assembling. The springs go in the small holes on the left & the other ends slide over "posts" on the right side. The case is "keyed" with a notch & can only go back together one way. The position of the springs & posts will also clue the correct orientation.

When re-installing the switch, depress the brake pedal & keep the red sleeve fully extended until the switch snaps into place. Then push the red sleeve back into the switch body to lock the switch into the bracket. The white post is ratcheted & will automatically adjust itself when the brake pedal is released. As usual, re-assembly is reverse per above.
Misc. The switch is a DPST (double pole - single throw), normally open when the brake pedal is released. Connectors 1 & 2 are one circuit and 3 & 4 are the other.
Other causes of "Brake Light Circuit" error can be brass or other non-BMW brake light bulbs. I recommend using the OEM (Osram) nickel bulbs. Check the bulbs to see if they have dirty or corroded sockets & clean accordingly (Stabilant 22a here too). Also, check fuses & the "mustard relay" (88-91 models), and the LKM for later models. What has happened is the check control has sensed an increased resistance in the circuit which is above its tolerance level & trips the fault. The points in the switch are the weak link in this circuit (aside from a burned out bulb or blown fuse) and are prone to arching & with each arc, the resistivity of the contacts is affected until the situation degrades to the point of precipitating the message. I might add that this is the fourth time this switch has been replaced or repaired in my car.
gale, 92 735i