1-30-2002
Disclaimer: A proper brake job requires a close knowledgeable inspection of all brake related components. I offer this condensed summary for information only, numerous steps have been left out. With that said, an e32 is one of the simplest rotor/pad replacements I've had the pleasure to work on, short of a Porsche 912 that I once owned. Bentley's has an excellent section on brakes which renders this entire page unnecessary, so refer to it to fill in the blanks. Plan about 2 hours for the job, way less time than it takes to do this html write-up
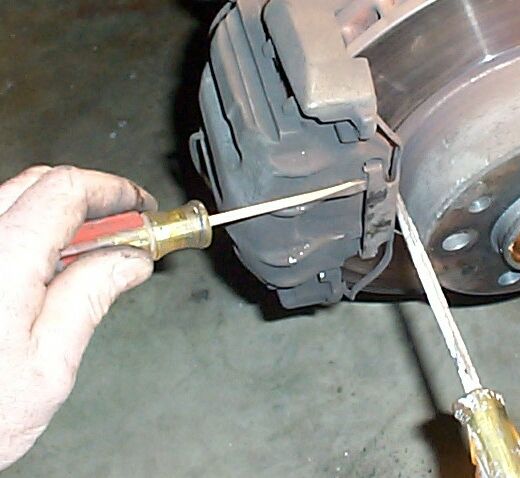
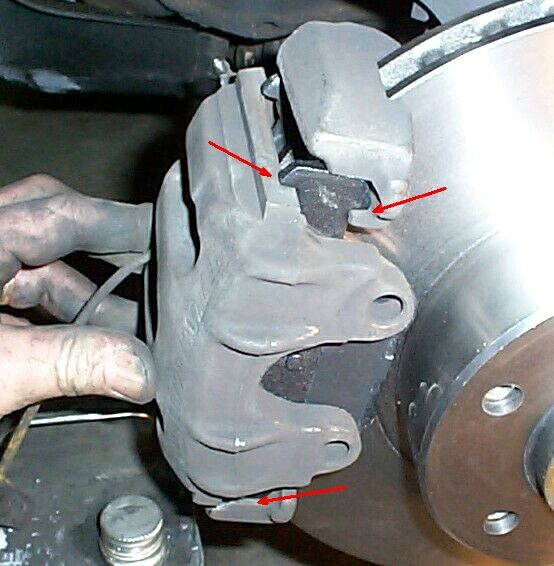
Pry out the anti-rattle spring clip.

Remove the rubber caliper pin dust caps (2 ea.).

Unplug the brake wear sensor lead.

Remove the caliper pins with a 7mm allen wrench.

Polish the pins with a wire wheel to remove any crud. Wobble the caliper slightly to loosen the pads and slide off straight forward.

Remove the rotor retaining screw (6mm allen).

Here's the beauty of this design. The rotor simply swings outward & off without removing the caliper carrier bracket.
Check the condition & thickness of the existing rotor if re-using. My old ones had good smooth surfaces & braked smoothly, but were worn beyond the wear limit. New, they measure about 1.103" thick, the DOT minimum thickness wear limit is 1.039" (26.4mm). Mine measured 0.998" & had a definite lip at the outer brim, time for new ones.
Now for a little humor: check out this one from an unknown source:
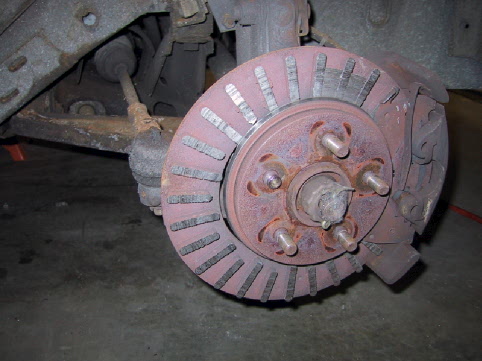
Not mine. How could someone drive it that long without knowing something was wrong? I'm still trying to figure it out. If it wore completely thru to the back half of the vented center, what kept it attached to the hub such that it would still rotate? The outer pad looks like it is rubbing directly on what is left of the rotor. Go figure!

Clean the hub flange & make sure there isn't any build-up of rust or dirt. Spray lightly with WD-40 or thin anti-corrosive lubricant, apply sparingly. New rotors come with a cosmolene coating, clean them with solvent, & then thoroughly clean the rotor surfaces with isopropyl alcohol or brake cleaner & wipe them dry with a lint free cloth. Avoid touching the rotor surfaces. Additionally:
"All the manufacturers of brake pads and rotors now recomend that you do a final cleaning of new or remachined rotors with warm water and dishwashing detergent (use a stiff bristle brush). It seems that particles are imbedded in the surface of the rotor during the machining process and this removes them. They state that this will greatly increases braking effectiveness and reduce break in time also." (thanks to Bill R. for passing this along). Do this after the solvent wash & dry thoroughly with a lint free cloth.
The exception to this is ATE "Power Disk" rotors, which may come with instructions and a haze-like coating on the rotor surfaces. If so, do not wash it off or use solvent. (thanks to Glen on bimmer.org for mentioning this).

Install the new rotor. Insert all of the wheel lugbolts finger-tight to center the rotor on the hub before tightening the rotor retainer screw (torque = ?, someone e-mail it to me if you find it)

The tapered lugbolts will center the rotor when snug.

Depress the brake pedal with a stick about 7-1/2" or 8" long, propped on the underside of the dash. This closes the master cylinder fluid reservoir to prevent old brake fluid from being transferred back up thru the brake lines when retracting the brake caliper pistons.

Inspect the rubber boot on the piston for condition, deal with accordingly. Open the bleed valve slightly while retracting the piston back into the caliper. This dispells most of the old brake fluid without the risk of overflowing the master cylinder reservoir. Tighten the bleed screw to 44 in-lb (if 7mm screw, 9 to 12 ft-lb if 9mm screw).

Piston fully retracted. Yes, it's a dirty job, wear disposable gloves.

Poor man's piston retractor, 3/8-16 nut tack-welded to barstock on right, oversized nut tack welded to barstock on left to center the end of the eyebolt.


Caliper spreaders are also available at most discount tool & auto parts supply places for $5 to $10.

If reusing the existing pad thickness sensor, remove it & transfer it to the new pad. It goes on the inside pad. There is a tiny bump on one side of the sensor. It faces the wear surface of the pad.

New pads: the one with the spring clips goes on the inside. The clips push into the caliper piston.

The Raybestos pads come with an anti-squeal damping pad. Peal the paper backing off of it & stick it onto the backs of the new pads.

If the new pads don't come with damping pads, spread a liberal amount of anti-squeal compound on the backs of the pads.

Bill R. recommends the Raybestos ceramic "Quiet Stop" pads to his customers for normal street use. They are reputed to be quiet & less dust, with good braking qualities. Come with lifetime warrantee, about $55.95 a set from Checker Autoparts, part number PDG394QS:

I went with the less expensive semi-metalic "PG Plus" pads, $39.95, part number PGD394M at Checker, they didn't have the ceramic pads in stock at the time. This is the first time I've tried them. My old pads were the stock Jurid's which were quiet & had good braking, but awful dust.

Slide the caliper/pad assembly back onto the rotor. The caliper quide bolts go back in dry, but it wouldn't hurt to put a small amount of anti-seize on the threads. Torque the caliper guide bolts to 22 ft-lb. The sliding surface of the caliper where the ends of the pads slide, should be clean & free from any corrosion or pitting. I wirebrushed them well & scraped them with a razor blade to make sure they are smooth. A tiny amount of heat resistant grease here would be o.k. but I put them in dry. There was evidence of anti-seize paste on them when I took them apart.
Pump the brakes a few times to seat the pads. Have a friend push on the brakes hard & look for leaks & see if the pedal remains firm. Inspect for complete re-assembly & install the wheel. Torque the lugbolts evenly in a cris-cross pattern to 74 +/- 7 ft-lb.
Checklist:
1. Hoses & calipers in good shape
2. Anti-squeal shims or compoud installed
3. Caliper guide pins torqued
4. Caps installed
5. Fluid bleed screw tight
6. Dust cap on
7. Sensor lead plugged in & clipped into its bracket
8. Pads installed properly
9. Anti-rattle spring clip installed
10. Rotors centered
11. Rotor retainer screw snug
12. Reservoir fluid topped off
13. Rotors clean & rotate freely
14. Wheel lugbolts torqued
15. No spare parts? (if you disassemble something enough times, you'll have enough spare parts to make two of them :-)
Road test the car. Drive carefully since braking will be weak at first until they seat in. ATE "Power Disk" rotors will seat in quickly with 4 or 5 firm stops from about 45 mph. The plain OEM ATE or Balo rotors should be braked lightly for the first 200 miles before doing any hard braking, to seat them in properly.
You'll notice I deliberately left out any procedures on bleeding the brakes. That's because I've had little success at it & recommend having a shop do them, especially with ASC systems.
Click here to go to "Rear Brakes"
gale, 92 735i
this page has been visited times since 02-02-02