Revised 9-27-2003 (added oil spray bar bolt safety tie wire)
This topic is covered very well in Bentley's, Ref. sec. 116-3 for e32's & sec. 4 pg. 11 for e28's. All m20 & m30's will be generically similar.
I wrote this for those who don't have a Haynes or Bentleys or other shop manual.
I prefer to set them with the engine cold overnight. Remove the sparkplugs in advance while the engine is still warm, it makes it easier to rotate the engine by hand & if it's time to adjust the valves then it's probably time for new plugs too.
Remove the air cleaner & loosen the large hose clamp on the back side of the MAF. The MAF comes off easily, pinch the wire bail on the connector to the left & unplug it. There are 3 clips on the bottom of the 3 shockmount cushions:

These slide off with a jewelers screwdriver. I'll skip the rest of the details of removing the valve cover since it's very accessible & intuitive.
With the valve cover removed, rotate the crank by placing a 36 m/m (1-7/16) socket on the bolt on the center of the harmonic balancer. For e32's & e34's, remove the fan shroud. If you have a 32mm wrench for the fan clutch, it helps to remove the fan for better access to the crank bolt. You can also jumper pins 11 & 14 in the diagnostic socket to use as a remote starter to rotate the crank:
Position cyl. #1 at top-dead-center. The tips of the cam lobes for #1 will be pointing downward, an imaginary centerline which bisects the included angle between the intake an exhaust lobes will line up approximately with the centerline axis of the piston travel. You can confirm top-dead-center by inserting a long slender screwdriver into the sparkplug hole & feel for when the piston reaches the top of its travel.
Slide a feeler gage (.012" for e28, e34, & e32 3.5 liter M30, & .010" for e28, e34 2.8 liter M20) between the eccentric & the tip of the valve stem:
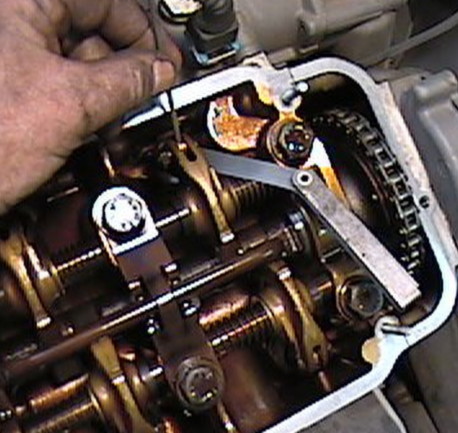
If sliding the feeler gage is too tight or too loose, it will need adjusting by loosening the 10 m/m hex nut which pinches the eccentric, & rotating it via the hole with a wire, I made a set of adjusting wires with some 1/8" rod (.120"):
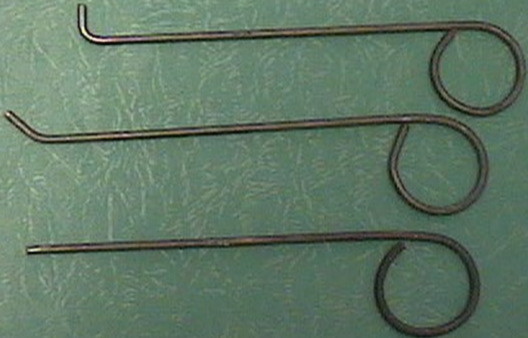
The end of a #31 or #32 drill or a nail would work in a pinch, but the wires are nice because they provide a certain amount of tactile feel and after a while, you can set the gap pretty close by the springiness of the wire. Rotate the eccentric toward the middle of the head to loosen & toward the side of the head to tighten. The feeler gage should slide freely back & forth but you should feel a little friction resistance. Snug the pinch bolt tight & check the slide of the feeler gage again, loosen & repeat if not right. Tighten the pinch bolt 88 to 90 inch-pounds. I tend to tighten the pinch bolt on the heavy side for fear of an eccentric loosening. Some day I'll probably strip one or snap one off so I keep a spare bolt & nut in my toolbox.
Follow the firing order 1-5-3-6-2-4, & move on to cyl. #5 by rotating the crank 120 degrees (clockwise if facing the front of the engine). Repeat adjustment until complete. It's a good idea to double check cyl. #1 after finishing all 6. Maybe check them all if it's your first time.
for m30's, CHECK the tightness of the banjo bolts on the oil spray tube!!! Mine were starting to get loose, but caught it in time. If the banjo bolts are not tight, then I highly recommend removing them one at a time & clean them really well & re-install with Loctite #271 (semi-permanent). Don't tighten them too tight or it will start pinching off the oil tube. The torque spec. it 8 to 10 ft-lb. New style bolts are available from the dealer with a lock patch on the threads, they are recognizable by a circular ridge on the top of the bolt head.
This time one of the banjo bolts was loose again so I removed them and cross-drilled the heads with a #50 drill (0.070") to make provision for a safety wire:
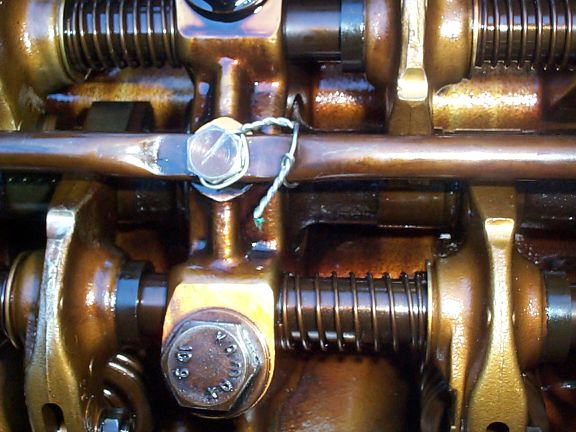
I snugged the bolts before removing them and scratched a mark on the head to locate the hole at an optimum position. There are no hard and fast "rules" for doing tie wire but the general rule of thumb is to have at least 4 or 5 tight twists in the wire and to alternate right-hand and left-hand twists if there is more than one set of twists in the same wire. Other than that, wire it to another cross-drilled bolt head or loop it around a nearby solid object such that if the bolt were to loosen, it would produce more tension in the wire. I also cleaned the threads and applied more Loctite to them. Be sure to use the proper wire. I bought a spool of annealed 0.041" stainless steel safety wire at Harbor Freight.
Re-assemble everything & you're done. Bentleys says to use a new gasket but I get 2 or 3 uses on mine . . . your call.
gale, 92 735i