12-28-2001
OEM Boge shocks & stock springs being changed out with Bav Auto lowering springs and Bilstein Touring strut inserts.


Before & After
I started the job by first loosening the lug nuts on the front wheels, then I removed the rubber caps on the tops of the strut towers under the hood, & loosened the nuts on the top end of the strut shaft with an impact wrench. I left them on finger-tight to keep the struts in place while working below. Next I put the front of the car on jackstands and removed the front wheels.
Remove one of the swaybar link ends. It doesn't matter which side, top or bottom, whichever is easiest to get to. This helps later when lowering the strut housing to remove the spring & insert.
Loosen all 4 bolts on the control arm bushings.
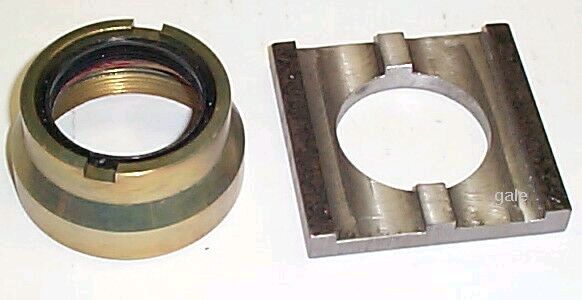
There is enough room between the coils to loosen the strut insert retainer collar with a pipe wrench while everything is still assembled:

Use some Liquid Wrench/WD-40, etc. if necessary. Maybe even a little heat with a propane torch and an extension pipe on the wrench if necessary to get the nut loose. I've heard of some who have had to resort to slitting the collar & remove it with an air chisel. The new strut inserts should come with a new collar nut so don't worry about marring the old one. I loosened it until it was finger-tight & left it on until actually ready to remove the insert. I soaked mine with Liquid Wrench many times, weeks before actually doing the job, anticipating it being snug.
I've been told the standard spring compressors available for rental might not fit our BMW's so I kludged one together with 1/2" all-thread:


Whatever you end up using, be very careful with it. Make sure it is stout & in good condition & attaches to the coils in a manner that it stays in place. A compressed auto spring stores a lot of energy & can do substantial damage & personal injury if it lets loose unexpectedly. Proceed at your own risk! If in doubt, let a shop do the job for you.
There are two pockets in the upper strut tower 180° apart for access to hook the compressor clips into. Try to get it to span at least 4 coils, 5 coils is even better. Space the spring compressors as close to 180° apart as possible. A 3rd compressor would be even better, then try to space them more closely to 120° apart . When ready to compress the spring, I jacked the bottom of the strut bracket up until it just barely unweighted the jackstand on that side:


This compresses the spring most of the way beforehand & minimizes the amount of wrench turning to compress it the rest of the way. Remove the grommet on the ABS lead wire from the support clip in the wheel well. When the spring is adequately compressed, lower the jack & support the suspension with wood blocks & tilt the top of the strut housing out of the wheel well to allow the spring & strut to slide out. When it came to this part of the job, I was too involved in the actual doing to take a picture. Note that the rubber brake line hose will be the restraining element in keeping the suspension from tilting out further & be careful not to damage it.
Some strut inserts call for pouring about 20 or 30cc of motor oil down the strut tube for heat transfer. Bilstein's go in dry so I suctioned as much of the existing oil out of the tube & sopped up the rest with a rag on the end of a wire. It doesn't have to be bone dry, just try to get most of it.
The new spring and/or strut is ready to go in. Insert the new strut. I made a tool to tighten the Bilstein collar nut:
The Bilstein instructions call for 120 Nm which is about 85 ft-lb. The collar nut is stout enough to use a pipe wrench & just ballpark the torque. Bilstein discourages using a hammer & chisel to set the nut.
Pre-compress the new spring before sliding it over the strut:


If using Bilstein's, do not use the rubber bump stop(s) that were on the upper end of the stock strut. Slide the dust cover over the new insert & re-use the upper metal collar which has the tapered center hole. match the tapered end of the hole to the taper on the new strut shaft. Inspect the condition of the upper shock tower bearing, replace if necessary. Clean & place the lower rubber spring seat cushion in the propper position. Slide the new spring into position. Clean & place the upper rubber spring cushion, noting the step for the coil end. The upper metal spring seat rotates 360°, match it's position with the end of the step at the coil end when raising the spring back into place. Put a jack under the suspension & guide the strut shaft back into the strut tower and put the upper washer plate & nut on. Verify that the coil ends are seated in the right azimuthal position top & bottom & remove the spring compressor. Remove the jack. I didn't have any problem with the strut shaft turning when tightening the top nut with an impact wrench. It has provision to keep it from turning with an allen wrench if using a box-end wrench in lieu of an impact wrench. Re-install any ABS or brake pad thickness sensor leads in the bracket(s) & repeat the entire process on the other side.
Don't forget to re-attach the swaybar link end. Replace the front wheels & lower the wheels onto blocks or drive it onto ramps & re-tighten the control arm bushing bolts with the wheels fully weighted. It's obvious just by looking at it that the toe-out has increased with the car sitting lower. I couldn't tell much by driving it but next week, it's off the the alignment shop to get it set right.
Here's a side-by-side of the old & new springs:
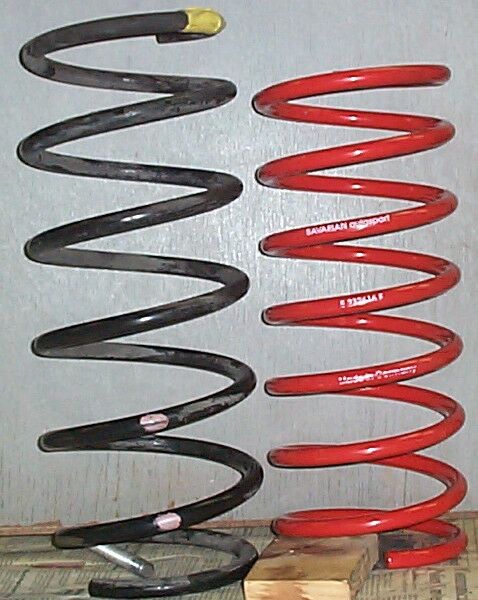
They appear to have the same wire gauge diameter, about .500" within .010 or .020", the Bav Auto's may be slightly skinnier but couldn't get an exact measurement with all the powder coat on them. The stock spring has 6-1/2 turns. The Bav Auto's have 7-1/2 turns. The stock springs have a larger coil diameter than the Bav Auto's which are about 5.5" o.d. The stock springs have a reduced coil diameter at the ends to about 5.5" as they both share the same OEM spring seat cushions.
Installation of the rear is pretty straight forward. I haven't done them yet as of this writing. It involves removing the rear seatback cushion to get to the top nuts.
Results/impressions: Mine lowered the front about 1.75" It measured 27.25" from the ground to the underside of the apex of the fender lip with the stock springs & now measures 25.5". It had about 3-1/2 fingers of clear space above the tops of the tires (stock 225-60-15) & now is about 1-1/2 fingers. I haven't done the rears yet but have driven it some. The ride is noticeably firmer & I feel most of the minor imperfections on surface streets. I'm told this is the nature of Bilstein's. It's not bone-jarring stiff as with some reports of H&R's & Bilstein Sports. Almost all of the dive in the front while braking has been eliminated. I'll have a better assessment when the rears are installed & have driven it more. I definitely like the Bilstein Tourings giving a tighter ride over the stock Boges. On a scale of 1 to 10 with 1 being mushy, I would rate the stock ride at about a 3 & the Bav Auto/Bilstein Touring combo about a 5 or 6.
Update: After 2 years, it reached a point where I couldn't stand the ride of the BavAuto/Bilstein combo any longer. I replaced them with BMW M-Tech springs and stock Boge strut/shocks. Best to leave suspension mods to the guys who designed the car in the 1st place. Now with the 5-spd, the front gets a little bouncy when going thru the gears so I will eventually replace the fronts with Koni adjustables.
Click Here to continue to the "Rear Shock Replacement" page.
gale, 92 735i